Pages

Sunday, July 24, 2011

Summer visitors...

Hi Everyone!  It's time once again for visitors.  This time it's my brother's step-daughter Vickie!  My parents are meeting her and her family about 4 hours away so they can pick up Vickie.  She will be staying for a couple of weeks.  Last summer she came for a whole month but this year she's been detassalling corn and in two weeks she starts another job as a bus girl at her aunt's restaurant so her time here will be much shorter.

This picture was taken last year a couple of days after I got my dog Bo!
We are all Iowa Hawkeye fans so the whole family had their picture taken in Hawkeye gear.
This was taken a couple of Christmas' ago when we had so much snow on the ground that my brother had to come get me so we could have Christmas.
And this was taken last year at the farm.  Vickie is very much a girlie girl as my mom would say it.  And I'm very much a tom-boy.  So she won't be interested in being my helper in the wood shop the way the boys are when they come to visit.  But maybe I can get her interested in some other craft projects.  We'll see how it goes.  She will probably spend most of her time with my mom as they are both into shopping and clothes and nails.  But we'll have fun playing games.  Thanks for stopping by.

Saturday, July 23, 2011

Uprinting winner....

And the winner of the UPrinting giveaway is.....


gail said...
ohhh, I'm a first? first never wins! :( I could use these for my blog/booth and or a show I have coming up in october! I love uprinting! gail ps yep, I happily follow you!


I had to take a picture of it because a) I didn't know how to copy it in a paste it so it would show up and b) because I didn't think anyone would believe me that #1 was selected.

So congratulations to Gail @ MyRepurposedLife! I'll be in touch with you Gail!

Have a great weekend!  I'm off to a Family Reunion!


Friday, July 22, 2011

Fluff and Fold....

Hi Everyone!  Happy Friday!  I hope everyone is surviving this heat.  My yard is starting to turn brown since we haven't had rain in 3 weeks and the heat has been terrible.  Last night I awoke to major thunder and lightening but no rain.  Not a drop.  And since I don't want to lose my entire yard, I think I will have to begin watering it at night. 

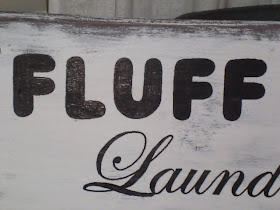
I want to share with you my latest sign.  Do you remember the antique ironing board that my Aunt Barb gave me?  It had two broken legs and I seriously thought about repairing them since I think this ironing board had belonged to my grandmother.  But I decided to make a laundry sign instead.
And this is what I came up with.  I started out by removing the broken legs and the hardware which was next to impossible as the bolts and nuts holding it together where stripped and the nuts were broken.  So I had to get my Dremel out, attach a cutting wheel to it and cut apart the bolts or cut the nut in half to remove it.
Then I glued and filled some cracks and sanded it down.  I thought about not painting the board itself because it had great patina on it, but after further investigation, there was some damage that needed repaired which meant I'd have to sand it.   And then there goes the patina, so I painted it.
I painted the base coat burnt sienna, then a topcoat of white.  Then I sanded it.
Next, I drew on the letters and then hand painted them in black.
And finally, I added the three hooks to the bottom of the sign.
The only thing I haven't done yet and can't decide if I will, is to sand the letters down and give them that aged look.  What do you think?
I wish I had an actual laundry room (my washer and dryer are in my unfinished basement that used to be the cellar until cement was added to most of the walls and the floor).  So it would not be enjoyed as I do not spend anymore time there then I have to.

Now the trivia question for the day:  What movie has a line in it about Fluff and Fold laundry?  Any ideas?  One character says to another, "Fluff and fold, buddy. Soon as I make it really big, I'm going fluff and fold.  I understand the fold but what's the fluff?"  The other character says, "That's what I write for the paper." 

Thanks for stopping by.  Have a great weekend and be careful out in the heat!

Thursday, July 21, 2011

Chalk painted chair...

Hi Everyone!  I hope you are all surviving the heat wave that's going on around the country.  It's been so hot here this past week that it takes my breath away every time I step outside.  It has made it next to impossible to get any building done, so I'm now behind on my projects for the two upcoming craft fairs that I'm attending.  I've been working on small projects in the house and have yet to move the building inside.  But if the heat doesn't break soon, than that's what I'm going to have to do.  Cut my boards outside, carry them in and then put them together in my living room.  I had to do it that way last summer too.  I would rather not, but sometimes you have to do what you have to do.  

So just what have I been working on...
This chair/step stool has been here on the farm ever since I can remember.  I've seen pictures of my older brother at about age 16 months sitting on it, looking just like it does in this picture, so I know it's been here for at least 40 years.  Before I moved in, it sat in the kitchen at the bottom of the stairs going up, holding the door open.  I moved upstairs into the hallway because I didn't need it in the kitchen and wasn't ready to remake it.  But now that I have the island in my kitchen almost completed, I needed stool and this is almost the perfect size.  It's a hair short, but I didn't want to spend much money on the island so I had to use what was on hand.  I could have taken it apart and reupholstered the back and the seat, but I didn't want to spend any money on this remake, so I painted it with ASCP in Graphite.
So here it is after it's paint transformation.  Sorry about the lighting on the picture, the back isn't really blotchy in the center.  I was surprised with how the chalk paint went on this one.  It didn't leave a texture like it does on furniture pieces and the vinyl still feels really soft.  We'll see how it holds up.  I can always reupholster it later when I feel like spending a little money on it.

The only thing I have left to do is attach the painted cork to the steps of the step stool part.  And the only reason I have to do that is because when I pulled the carpet off that had been on the steps it left a very gritty feel to it that I can't get off of it. 

I have a few more small things to do on the kitchen island and a couple of other stools to remake and then I'll be showing you the big reveal.  Well, thanks for stopping by.

Also, don't forget to sign up for the Uprinting.com giveaway.

Link Parties:


Sunday, July 17, 2011

Uprinting giveaway...

Hi Everyone!  I get to host my very first giveaway for UPrinting.com.  I am giving away Nightclub Flyers/Flyers that are perfect for save the date cards, party invites, announcements, special events or anything else you can come up with. 

http://www.uprinting.com/flyer-printing.html
The winner of this giveaway will receive:

Your choice of either 4.25" x 5.5" or 4" x 6"
14pt Cardstock Gloss, Front Only Printing,
nightclub flyer templates and business flyer templates also available for download
3 Business Days Turnaround, *Free Shipping
Uprinting even has great templates to get you started and to give your flyers that really professional look.
This giveaway is open to US residents 18 years old and above only.  It begins Sunday, July 17th and ends Saturday, July 23rd at noon Central time.  I will then announce the winner.
Here's how to win:
1.  Follow Full Circle Creations and post a comment that you are and what you would want to use your flyers for.
2.  Tweet or post on Facebook about this giveaway and then leave a comment that you did.
3.  Follow UPrinting on Facebook and leave a comment that you did.
4.  Follow UPrinting on Twitter and leave a comment that you did.
Good luck!
Disclaimer:  This giveaway is sponsored by UPrinting, no monetary compensation was given and I will receive night club flyers for hosting. For more information about flyers, please visit UPrinting.com.

Saturday, July 16, 2011

Recent finds...

Hi Everyone!  Happy Saturday!  I wanted to show you a couple of recent freebies that were given to me.  My uncle Bill, okay he's really not my uncle.  He's my mom's cousin, or my grandfather's nephew, but he's always been close to my grandfather and thus seemed more like uncle then cousin.  Anyway, he came across this  headboard at a "junk" shop and bought it for $3.  He thought I could use it to make one of my headboard benches.  I have another headboard that has the same shape, but without the iron insert that would look good married with this one.
 These headboards and footboards are actually bunk beds also courtesy of my uncle Bill!  He rescued them from going to the landfill.  My uncle Bill used to run the sanitation company which he bought from his father Ivan.  Then when Uncle Bill was ready to retire he sold the business to his son Jerry.  So I guess you could say I come from a long line of "junkers".  Cousin Jerry and Uncle Bill are always on the look out for things they think I might be able to use.  So I guess I have an "in" in the junk world around here.  Thanks for the headboards Uncle Bill!
They need cleaned up and one of the top boards is cracked but can easily be repaired.  So I have a lot of work to do.  Unfortunately it's hot here.  The heat index on Friday was 105 degrees and it's to be that hot all weekend.  And unfortunately I don't have air conditioning out in the shop.  So, unless I can take it into the house to work on, not much is going to get done.  Last year when it was so hot out I actually did build three benches in my living room.  I'd take a list of measurements out to the shop, cut all that I could and then carry them back into the house and put it all together on my living room floor.  Then move the finished pieces back out to the shop for sanding and painting.  I'm not really wanting to do that this year, but I have two back to back craft fairs coming up so I just might have to turn my living room into a building zone.  Well, have a great weekend!  Be careful for the heat!  Thanks for stopping by.

Friday, July 15, 2011

My first Chalk paint project...

Hi Everyone!  Happy Friday!  I'm so sorry I've been MIA lately.  I've been working on projects trying to get ready for two craft fairs and I've been busy with work.  You know how it gets.  I wanted to share with you the first project I did with Chalk paint.  This is a piano bench that I've had since I was around 8 years old.  I had a really cool, antique (even back then) upright piano.  We moved to a new town and it was to be the last thing loaded on the moving truck, but it did not fit.  So we had to leave it behind, but the piano bench had already been packed.  And this is all I have left.  I never took lessons again because of course no piano to practice on.  But this bench has moved around with me and has been living in a corner of my living room with family pictures on it.  I recently moved it to the end of the couch I made but haven't been happy with the color.
Or the two-tone look. And I've never wanted to refinish it and have always been a little nervous about painting it.  But I'm not sure why.  So I thought this was a great first project for me to try out chalk paint.
 What an ugly orange inside.  I just had to show you the inside too.
 And here it is now with Country Grey.  The top took two coats of  paint to cover that water stain and keep the red mahogany color from coming through.
 I lightly sanded the edges and places where feet would hit the stretcher at the bottom.
I know the book that came with my kit said to wax and then sand, I did it the opposite.  I'll have to try it the other way too and see what the difference is.  I used the clear wax and then the dark wax but only in a few places.
And I really like the way it turned out.  I liked not having to prime it and then paint it, but even if I had, the top color would most likely have needed two coats because that red and water stain have been there forever!  Overall I'm really happy with the chalk paint.  I can't wait to try out the other colors.  Well, thanks for stopping by.

Tuesday, July 12, 2011

And the winner is...

Hi Everyone!  Sorry I didn't get this posted until today, but the winner of the sign giveaway is........

#4 Jester said... CONGRATS!!! I just hit 48 the other day..and yeah, I get all giddy to!!! Count me in, I've been loving your stuff for a while!

Congratulations to Jester!  Email me your address and the sign you decided on!

Thanks again to everyone for signing up!  Thanks for stopping by.

Thursday, July 7, 2011

A sign of my own...

Hi Everyone!  Happy Thursday!  I made myself a sign.  I needed a sign to take with me to Craft Fairs so I took my logo and put it on an old piece of wood shelving that my grandfather had put up in the third bedroom of the farmhouse.  It went the width of the room since there was no closet in this room and he had taken out the closet for the room next door and needed a place to store items for both rooms.  I took it down after I moved in and put up a new closet and have been using portions of that shelving for a while now and this is the last piece.  I didn't have to cut it down at all, it was the perfect size and shape.  This logo is also on my business cards.

I painted the board cream, then sketched the logo on and hand painted it all.  Then I put an antique glaze over it and let it dry.  I sanded the edges a bit, but not much.  I was planning on hanging it, but now I think I'm going to make a base so it can stand on it's own and then a topper, just to give it a uniform look.  I think I'll do the base and top in black.  I didn't want to wait to show you since I was so happy with how it turned out and I just decided to do the base.  Well, thanks for stopping by.

Don't forget to sign up for the sign giveaway!  Click here.

Wednesday, July 6, 2011

Book Birdhouse....

Hi Everyone!  Happy Wednesday!  I don't know if you remember seeing the book birdhouse I made a few weeks ago for my mom to use as decoration at her local library, as seen here.  But Korrie over at Red Hen Home saw it and then sort of challenged me to make one out of a book.  Then she sent me the link Country Business that gave directions on how to make them.  I saw that she posted yesterday about the ones she made so I thought I'd show the ones that I made this past weekend.


The only thing I have left to do to mine are the perch and bird hole.  I'm going to go through my rusty washer and square nails to find just the right ones.  My mom also suggested using a really large button in a funky color.  I'll have to see what I can find. 

If you're looking for a tutorial, go to Korrie's site here for a great tutorial or to the Country Business site listed above.  Thanks Korrie for sending the site to me!  My mom really loved this idea.  Thanks for stopping by.

Don't forget to sign up for the sign giveaway.  Click here.

Tuesday, July 5, 2011

Storage bench...

Hi Everyone!  I wanted to share with you the project that my nephew helped me build.  We started out just making a regular headboard bench using two twin size headboards.  They didn’t match perfectly, but they were similar enough that I thought they would make a good bench.  I started out by cutting the shorter of the two headboards in half.  Then I cut the turned ball off the posts of the shorter headboard that has now become the arms.  I cut and sanded them off because they didn’t match the ones on the back headboard and it gave it a unique look. 
 I clamped the arms to the back headboard, and in three different places, drilled holes through the back of the headboard into the arms, added glue and then screwed the two headboards together.  Then we measured the side of the arm from post to post and glued, nailed, and drilled pocket holes and screwed them together.  I have a tendency to over build benches so that they can withstand the weight and then I know they are secure and going to last.  My mom always says that an elephant could sit on them.
 I don’t have pictures of the in between portions where my nephew and I made the frame for the seat area because I had decided to turn it into a bench with storage and since I hadn't made one before it was a little trial and error and working without any plans.  So of course the camera wasn't in my thoughts at the time.  My nephew and I made the frame for the bottom of the storage area.  I added the support and the end pieces of the storage unit.  If you notice the end pieces that are green is a large scrap piece of luan that I was using as my spray painting board.  It just happened to be the perfect size for the end pieces.  All I had to do was cut it down, insert it and glue and nail it in place.
I cut the bottom piece of the storage from a large piece of luan that I had in the wood shop. I glued it and nailed it into place.  We added several other pieces on the bottom side of the luan to better support it, again gluing and nailing it into place.
This is a spindle that was cut in half from another headboard when I cut it half to make arms.  I like to keep these pieces because you never know when they will come in handy.  I added it as a decorative piece to each side of the outside front arms to cover the slots where the rails would have slid into instead of filling it with putty or silicone.
Up to this point all of the wood was scrap pieces that were left over from other projects.  We had to go to the lumber yard for a piece of 1x12” for the front and back of the storage unit.  I decided not to use luan for these pieces as they will carry some of the weight on them.  

 Here you can see an additional piece was added to the front of the frame of the storage box.  It was added because the front piece of 1x12" needed to cover the inside leg where the rail slot is and so there was more edge for the lid/seat to rest on besides just the frame.
The boards for the seat were left over from another project.  It has two 1x8" and one 1x4" that had to be shaved down to fit.  We cut the boards to length first, then glued them and clamped them.  We let them sit overnight.  My nephew didn't like to use the glue and wasn't a believer in the power of wood glue.  But after seeing that the glue held those boards together perfectly, he's now a believer!  We also drilled a finger hole in the middle of the front board so that the lid could be opened.
 Since this is the top of the storage and the seat as well, we reinforced the glue with two wood strips that we glued and then nailed into place with the nail gun and then put a screw into each of the boards for added strength.  We also made sure that the strips were short enough not to interfere with lifting the lid up or with the frame brace that goes across the middle of the storage.
 Then we sanded all of the wood with the exception of the headboard and arms. 
 Here's my nephew testing out the fit of the lid after sanding it.
And here he is after we finished building it.  We didn't have time to paint it.  And I will be adding this to the painting pile.  I have several craft fairs coming up and have decided to build all the benches first and then paint them all at once so I don't have to put away the paint after each one or clean up the sawdust before I paint so it doesn't get mixed in to the finish.  Also, I don't have to interrupt the building process while waiting for paint to dry.  So we'll see how this goes.  But that's my first storage bench build.  It took a bit longer than I had anticipated but the first time usually does.  Plus I was showing my nephew how to do things as well as getting help from him.  We had a good time working on it and that is the main thing.  He thinks he can go home and build one himself.  I'll be sure an show you the finished, painted project when it's all done.  Well, thanks for stopping by.

Don't forget to sign up for the sign giveaway.  Click here.

Monday, July 4, 2011

Happy Independence Day....

Hi Everyone!  Happy Independence Day!


I hope you are having a happy and safe holiday with family and friends! 

Sunday, July 3, 2011

Sign, sign, everywhere a sign....

Hi Everyone!  I know it's not a major milestone, but I hit 50 followers a little while back, which seems like a bunch to me since I've only been doing this since the end of February.  Every time I get a new follower I get so excited!  And since I've been lucky enough to win a couple of giveaways, I thought I'd give back to this blogging community that I so dearly love!  I am giving away one of my signs as a thanks for embracing my little blog and always making me feel good about the things I've made.  
 These are a few signs that I've made that aren't currently in the Etsy shop but that I've posted about on the blog.

Since this is a thank you for being a follower, then in order to win you need to be a follower.  That will get you one entry.  For an additional entry, head over to my Etsy shop and take a look around and let me know what your favorite sign is.  And for additional entries, promote it on your blog, Facebook, or Twitter then leave me a comment on what you did. 
And since I can't decide on which sign to put up for the giveaway, I've decided that it will be winners choice.  You can choose from any of the signs in this post or that are for sale in my Etsy shop.  I will announce the winner one week from today, Sunday July 10th.  Good luck to everyone and thanks for stopping by.