Tuesday, January 31, 2012

Wedding dress, take two....

Hi Everyone!  Yesterday was a great day.  We hit a record high of 66 degrees, which is crazy for January in Iowa.  The sun was out but the only draw back besides having to work, was the fact that is was a cool wind.  But a great day none the less. 
 Yesterday I shared the wedding dress art that I made on a scrap of luan.  You can check it out here.  But I knew as soon as I pulled up the pictures of it that it was missing something. 
It was missing the antique look to it.  I did sand it, well, the background but I couldn't bring myself to sand the dress.  It definitely needed to be antiqued.

So tonight when I got off work, I antiqued the whole thing.  And here is how it turned out.  
Now that's much better.

What do you think? Hope your week is going well. Thanks for stopping by.


Partying here:
http://www.thekurtzcorner.com/2012/01/tuesday-tutorials-link-party-no-22.html
 http://www.uncommondesignsonline.com/2012/01/uncommonly-yours-link-party-13-and.html
http://theshadyporch.blogspot.com/2012/02/rock-n-share-14.html

Monday, January 30, 2012

Wedding dress art...

Happy Monday!  I hope you all had a great weekend.  I was busy finishing up and starting some new projects.  Continuing with the wedding theme from last week, I painted a wedding dress.  Do you remember the ironing board as art I did this summer?  If you missed it or want to see it again, you can find it here.

Someone asked me if I had ever thought of doing that on a smaller scale.  In other words, she liked it but didn't have room for a large ironing board.  So, I remade it.
The picture makes the background look too blue.  It's actually a light gray color.
I took a scrap of luan that I had.  I trimmed it down some because it had a bad spot on it.  It measures approximately 16 1/4" x 20 1/2".  I painted it a medium gray color, then put a lighter color that I mixed with white and antique white.  It still seemed too dark, so I white washed it.
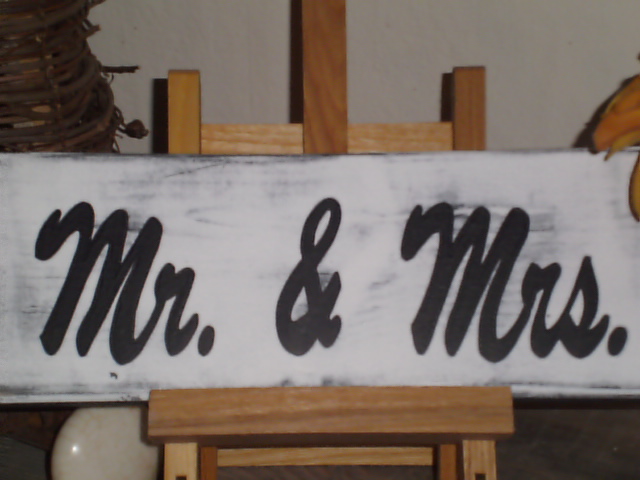
I painted the dress white and outlined it in black.  Then added the Dressmaker to the top.
The pictures really don't do it justice.  It washes it out too much.  There wasn't any sun today so the natural light really wasn't doing it and I had to use the flash.
And I added the same dressmaker info to the bottom.  I found the name and address on line.  All the lettering is done in black.

And there it is.  Now all I have to decide is if I'm going to frame it, or build up the edge on the back side to look like a canvas.  I couldn't decide before I started painting, so I'll have to decide soon.  I also took the sander to it and hit all the edges and some of the background.  I just couldn't bring myself to sand the dress or the lettering.
I'm happy with the way it turned out but I'm wondering if it needs a coat of antiquing added to it.  What do you think?  Do you like it as is or would you like to see it antiqued?  Thanks for stopping by.

Sunday, January 29, 2012

Lazy day?....

Hi Everyone!  Hope your weekend was good.  My dad sent this picture to me of the beach from their 5th floor condo in Florida.  The Iowa Windsock proudly flying.  I think it's his way of subtly rubbing it in that they are in Florida.
Isn't this the perfect way to spend a Sunday?  Wishing I was there...enjoying a lazy day...but no lazy day here.  I've been working on a few projects but alas, nothing is ready to share.  So enjoy the Florida beach and the Gulf water.  Have a good evening!  Thanks for stopping by.

Saturday, January 28, 2012

Basket love....

Hi Everyone!  Yeah for the weekend!  (Although I do have to work today.)  I want to share with you what happened yesterday morning at work.  One of the guys came sneaking around the front window at work carrying a load of things under both arms.  It took me a minute to realize what he had and once it registered I jumped out of my chair and made a beeline to the door.  Look at what he had...


And they were for me!

And they were FREEEEEEEEEEEEEEEEEEEEE!


You all know how much I love free things, but can you believe this haul.  A couple of the guys took a load of old water heaters and radiators to the Sanitation and as they were waiting to unload them, Keith looked over and saw that they were about ready to smash these babies.  He jumped out and ran over to the guy running the machine, got him to stop and asked if he could pull a few things out of the pile.  He saved these babies from becoming a pile of metal.  Keith knows exactly what I might like.  He's the guy that saved my kitchen island cabinets from the dump.  He's the guy that gave me an old trunk because he thought I might like it.  He's always on the look out for interesting things.  Thanks a bunch Keith for rescuing these!


Now, what to do with them.  Too many ideas, not enough of them.  What would you do with these bad boys?   Would leave them as is (only cleaned up) or would you paint them?  Hope your weekend is enjoyable.  Thanks for stopping by.

Friday, January 27, 2012

Wedding signs, part two

Hi Everyone!  The weekend is almost here.  Yeah!  I wanted to show you a couple more of the wedding signs that I finished yesterday.  See part I here.  I still have a few others to share with you, but they were not ready yet.  My thought is that they can be used on the big day or given as a gift for the big day and then they can fit nicely on a shelf after the wedding.


 I'm happy with how these turned out and how well they match the other two.  I will be adding these to my Etsy shop as well.


I think out of these three, this one is my favorite.  I loved fairy tales.  Didn't you dream of living happily ever after? 

All three signs have been painted with a black base and a white top coat that has been distressed.  The lettering has been hand painted in black.  I like these three, but can't wait to show you the others.  I wish paint dried faster....Thanks for stopping by.

Thursday, January 26, 2012

FREEEEEEE!

Hi Everyone!  I know I've said it before, but I'll say it again and again and again.  I LOVE FREE STUFF!  I wanted to share with you some of the things I got for free.  One of the truck drivers that I worked with at the Grain Elevator called me up and asked me if I'd like a few things that he and his wife had been storing but knew they weren't going to get to.  And of course I said YESSSSSS!

This all came from a house that was torn down.  It had been built in the 1880's and before it was torn down he and his wife went through and salvaged as much of it as they could. 
 They gave me three solid core, hardwood doors.  One was painted on one side and stained on the other side.
 The other two doors were stained.
 They gave me two cornice boards.  They need a little bit of work but won't they look great?  It's just calling out to be painted and for pegs to be added.  Maybe some numbers??
 Or maybe it needs to have a sign painted on it?  Isn't it gorgeous?
And I got two of these giant windows.  Can you imagine this painted??
It still has the hardware on it.

I'm so excited to get started on these new items.  I'm not sure what I'm going to do with the doors.  They are from the same era as my home.  And I'm almost thinking of you using one or more of them in my house.  So what would you do with these?  Do you love free stuff as much as I do?  Thanks for stopping by.

Wednesday, January 25, 2012

Wedding signs...

Hi Everyone!  Happy Wednesday!  I hope your week is going well.  I had a very productive day yesterday.  I want to show you a couple of the signs I finished yesterday.  I'm working on a new line of signs.  These are for a wedding or a wedding gift.  I decided to try to branch out a bit more than I have been in my shop. 
This is the Mr. & Mrs. sign.
I started out with a black base then a top coat of white paint. 
Once it dried I sanded and then sketched on the letters.
Then I painted the letters in black.  I thought about sanding the letters to give it an aged look but decided against it.  I still might...can't seem to make up my mind.

Continuing with the wedding theme, I made the Bride & Groom sign.
I made it just the same way I did for the previous sign.  But I sanded this one a bit more.
I almost painted the & red, but decided not to.  I also thought about making it a heart instead of the &.
Maybe on the next go round.

So those are a few of things I worked on yesterday.  Thanks for stopping by.

Tuesday, January 24, 2012

Window into spring...

Hi Everyone!  I hope your day is going well.  Today is my day off so I'm running around trying to get EVERYTHING done that I can.  Including finishing some things that I started this weekend.  And maybe start a few new things.  Since I don't have two days off in a row, it makes it difficult sometimes.
 Do you remember this window that I showed you a couple of days ago?
 It was given to me by the lady that runs the shop where I have items for sale.  She was kind enough to give me three of them for free!  Yeah for free!!  I started out by scraping the paint and caulk that was on the window and then I cleaned it really well.  I had to let that sit for a while to make sure it was super dry.  Then I started painting on it.  I started with the first layer of details in this case the black center of my flowers and then just build from there making sure the first layer of paint is completely dry.
It's a really simple look.  The poppies are in bloom.


 I was going to fill in the grass all the way to the bottom of the window pane, but as I started to fill it in, I decided I liked it not filled in.  I'm going sit with it a while and see if I'd rather fill it in.  I my mind's eye it needs to be, but I sort of like it this way.  What do you think?

 It's been super cold out here, so this is a nice way to bring a bit of "spring" inside.  Now I just need to find the hangers I was planning on using and get this baby hung up.  Are you dreaming of spring too?  Have a happy day!  Thanks for stopping by.

Linking to:
http://theshadyporch.blogspot.com/2012/01/rock-n-share-13.html
http://funkyjunkinteriors.blogspot.com/2012/02/sat-nite-special-120-old-windows.html