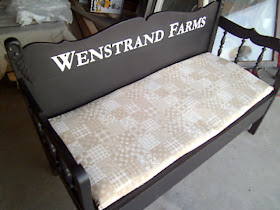
Hi Everyone! Happy Monday! I used to have Monday's off and my workweek started on Tuesday, but now I start on Monday, have Tuesday off and then back to work Wednesday, Thursday, Friday and Saturday. So things feel a little strange to me. A week ago last Saturday night, I got a call from a client whose daughters had ordered this bench for her, telling me how much she loved it and that she wanted to order one for her sister-in-law. YEAH!
I loved it when people are truly happy and excited about the things I make and I hardly ever get to hear from those that receive it as a gift. So I was thrilled that she not only liked it, but that she liked it enough to order one as gift for someone else!
So I got started on it right away Sunday. My parents asked me if I ever thought of telling her it would be a while since I was in the middle of getting ready for two craft fairs...uh no...it never even crossed my mind. She's a paying customer now and I can squeeze those in anytime! So this is the headboard/footboard that I found in my stash. I got it at the local used furniture store for a very reasonable price, I just can't remember what it was. But the footboard is very short and I don't like the top of the posts with the wing look. So I cut the tops off and I added feet to the footboard.I'm using the two larger ones for the feet and the more rounded ones for the top of the back posts. I know they don't match, but since they won't be side by side, I think it will work. Especially since you'd expect the feet to be wider at the base and less rounded.
So after cutting the footboard in half and cutting the wing part off the top of the posts and adding the feet to the footboard/arms, I started putting it together. I always begin by determining the height and the adding the support for the seat to the arm at the right height. Then attaching the front support between the two arms.
Then from there, I stand the arms up and clamp it to the headboard and make any adjustments that I need to. I have tried several ways to do this but this seems to work best for me since I don't have anyone helping me. Any other way and I've found I'd need an extra set of hands.
I drill a recessed hole in the back of the headboard to attach the arms at both the top of the arm and the bottom support. There are all sorts of ways to do this, but I find it's faster and easier for me. Then I remove the clamps and attach the back seat support. And that was the end of shop time that day because it was just getting too hot in there. But unfortunately for me, the next day that I came out to finish the bench with the cross supports and adding the seat, I forgot to bring along my camera and didn't think about it until I was done. Maybe next time if I can remember the camera! DUH Holly!
So here is the bench after the seat has been completed. I still have to fill the nail and screw holes and then sand the seat at this point. My client wants it painted black and wants Jensen painted on it. At first I was thinking of putting that on the front face of the seat, but now I'm thinking of adding it to the top rail on the headboard. So now I just need to get this painted on my day off Tuesday. I took the fabric and the foam, cut to size to Mom's this weekend so she can make the cushion for me. She's such a great help! And then I can get this crossed off my to do list. I'll show it to you when I'm done. Well, off to work I go, have a great week! Thanks for stopping by.


Holly-this bench is going to look fabulous black! :)
ReplyDeleteI'm glad you were able to squeeze it in. thanks for showing us how you did (most of) it.
hope you have a good week at work. (after you get tuesday off and get a lot of work done) :)
gail