Tuesday, June 17, 2014

Construction zone, part 2...

Hi Everyone!  I'm back for a little update.  The bad news is I'm still living in the middle of a construction zone.  But the good news is I'm getting closer to being done.  I can actually see a light at the end of the tunnel.  Part of the reason I haven't shared more in progress posts is that I didn't want to post anything here that I hadn't shared with my mom first.  And I wasn't ready to show her anything until this last week.  She hasn't been to the house to see it in person yet, but she has seen a lot of pictures.
One of the reasons it has taken so long is that I ended up removing the wall panels from the kitchen walls that my grandpa had put up (but were very ugly) then removing the layers of wall paper, repairing a couple of bad spots of the plaster and then applying new mud to the walls to give the walls texture.
I hadn't planned on doing this to all the walls in the kitchen right now.  Originally I was just going to remove the panels from the west wall and come back this winter to do the other walls, but I ended up doing them all at once.  It's been a long month working on the walls, but they look great and I'm so happy with how they turned out.
 Once the walls in the kitchen were primed and painted, I focused on the floor.  The carpet had been removed but in the process, a couple of the tiles pulled up since the carpet had been glued to the tiles.  I repaired the floors....I probably should have put new sub flooring, but I decided not to.  And I really like the floor.  I put the same floor down in the bathroom and laundry room as I did in the kitchen.  I like it so well that I'm going to put it down in the small living room too.
The base cabinets, counter top, sink and faucet have all been set and I now have water in the kitchen!  It only took just over two and half months but it was so worth the wait.  And I even have a small dishwasher although I haven't used it yet.  I installed an apartment size dishwasher to fit the space by the sink.  This house has never had a dishwasher.  I still have work to do on the exposed brick and the wall behind the stove (the stove is still not hooked up yet) and the back splash by the sink.  I also have to put the second coat of paint on the base cabinets.  But it's coming along.
I also started work on the island using the buffet that my cousin rescued from the garbage last year as the base.  I'm reworking the drawers and converting the doors into pull out drawers with self closing glides.  I also need to finish the cabinet I started building to house pretty dishes and hide small appliances.  And then I need to build the cabinet that will become the food pantry.  And there's a list of other projects that need to be done and trim that needs to be either installed or painted.
Once I'm done with the kitchen, I'll go back and finish the laundry room cabinets and the very long list of things in the bathroom.  Still no sink in there but it's because I need to work on the built in cabinet that my grandfather built that I have to finish the bottom half of where the tub had been.  And since I don't want to install the sink, then uninstall it to work on the built it and then install it again, I'm just going without a sink for now.
And during all of this construction, I've been working on lots of orders.  I'm getting closer to the end and to being able to show you everything that I've been doing.  Next time I'll show you some of the before pictures....back when it was my grandparents home.  Thanks for stopping by.

Sunday, April 27, 2014

Custom hand painted signs.....

Hi Everyone!  While I've been busy working on the remodel of my kitchen, bath and laundry room, I've also been busy with orders.  Almost a dozen signs along with some other larger orders.  A few are signs I've made repeatedly and several are new, custom orders.
I was asked to make this sign based on the sign I usually make that says Faith, Family, Farming.
The same gal that bought the Faith, Family, Friends sign also requested this Get After It sign.  Both of these signs are painted on 24" long boards.


The next two signs were ordered by my boss's niece.  And I really like the way they turned out.
The family rules sign is painted on a wooden canvas that I built and is 12" x 36".  I painted the base dark brown then a top coat of tan.  Then lightly sanded it to reveal the brown.  Then the fun began.  I hand painted the words on.  I began with the Aust Family Rules and then the Love and worked my way up the sign so that I could get the spacing right.  That way if I ended up with a bunch of space it wouldn't look odd separating the Family Rules from the list of rules.  Then I lightly sanded the words.  Which is always difficult for me to do after hand painting all of those letters.  But it turned out looking pretty good.
And the second sign she ordered was this one.  She saw it in the Pottery Barn Kids catalog and asked me to recreate it.  I built the wooden canvas, it's 22" x 24" (it's not really pallet wood, just made to look like it), then mixed a custom blue/gray paint (it looks more blue in this picture) and hand painted the letters in white.  I think it turned out pretty well.  And best of all, my client was happy with them.

I have a couple of other signs to finish up that were ordered this past week, a couple of pieces of furniture to paint for one of favorite clients, a headboard bench to build for another client and lots of work to do on the house.  I'm making progress on the house.  I spent this week working on a plaster wall in the kitchen and finished that on Sunday morning.  Then started working on the built-in upper kitchen cabinets that my grandpa built and I'm keeping.  I'll share all the details soon.  Thanks for stopping by.

Linking to:
http://www.myrepurposedlife.com/2014/05/catch-as-catch-can-162.html

Wednesday, April 9, 2014

Construction zone....

Hi Everyone!  I haven't fallen off the face of the earth and nothing bad has happened to me (thanks for your emails of concern), I've just been over the top busy working on the house and a dozen orders that have come in.  What started out as a small bathroom remodel that shouldn't have taken more than about a month has turned into a three room remodel of the bathroom, turning the large pantry into a laundry room, replacing the door between the kitchen and the back porch and a kitchen remodel.  (I've randomly picked pictures to share with you, more details to come).
I've been living in a construction zone, which wasn't too difficult for the first month or so, but has now become horrible.  The only thing that keeps me going are the positive changes I see happening almost everyday.
What makes it the most difficult is not the dust (I've been able to keep that pretty much under control) but for the last two weeks I have been living without a sink.  I don't have one in the bathroom (it isn't here yet) and haven't for a while, but about two weeks ago I pulled the one in the kitchen so I could send it and several other items home with my brother for one of his friends to use in their home remodel.  And I haven't been able to get the new one installed because my counter top isn't here yet.
I've been taking lots of pictures and can't wait to share the after pictures (once I have them).  It's been an adventure and I've discovered things about the house along the way.  But I really can't wait for it to be over.  I had been trying to keep the mess out of the studio which worked for a while but I've had to move items from the kitchen and bathroom into the studio.
I've purged a lot of things both to the dumpster and to the garage to be donated once the remodel is completed.  Changing the pantry into the laundry room has been one of the best moves I could have made, no more going to the basement to do the laundry.  YEAH!
I've had to repair plaster walls in the kitchen and the drywall in the bathroom and laundry room.  I've put new flooring in the bathroom and laundry room and the kitchen is next.  The carpet (yes there has been carpet in the kitchen for as long as I can remember) should all be up by this weekend.
 I removed plaster from the chimney in the kitchen (well almost all of it) and I love the look of the brick (it still needs to be scrubbed with a wire brush, cleaned and sealed.  Trim in all three rooms needs to be done.  Cabinets in the laundry room and kitchen need to be installed along with counter tops.
The wall treatment in the bathroom still needs to be finished and the other walls and ceiling needs painted.  I need to remodel the built-in in the bathroom that my grandfather built and I careful saved and I have plans to build an identical one across from it to house everything that had been in the closet that now houses the shower.  I still need to build the vanity, the medicine cabinet and frame out the plumbing access area to also house a mini linen closet.
So much to do and not enough time in the day to get it all done.  But I will continue to plug away at it until it is all done!  Thanks for stopping by.

Tuesday, February 4, 2014

All you need....

Hi Everyone!  Well, it's snowing out.  It has been since about 10 AM and isn't suppose to stop until about midnight tonight.  Just the snow wouldn't be bad but it's blowing like crazy out there.  And it's starting to pile up in some places...like right outside my back door...the door I use to take the dogs out. At least they like playing in the piles.

In honor of Valentine's Day, I made a little framed artwork....
 ...in case you didn't know, I love things with birds on it....and I love to paint tree silhouettes...
...I don't decorate for Valentine's Day but I thought I'd make a few things for the studio, just in case.  And this is what I came up with...I like that it can be used all year long.  After all, birds and love are great all year long!  Thanks for stopping by.


Friday, January 24, 2014

In the rafters...

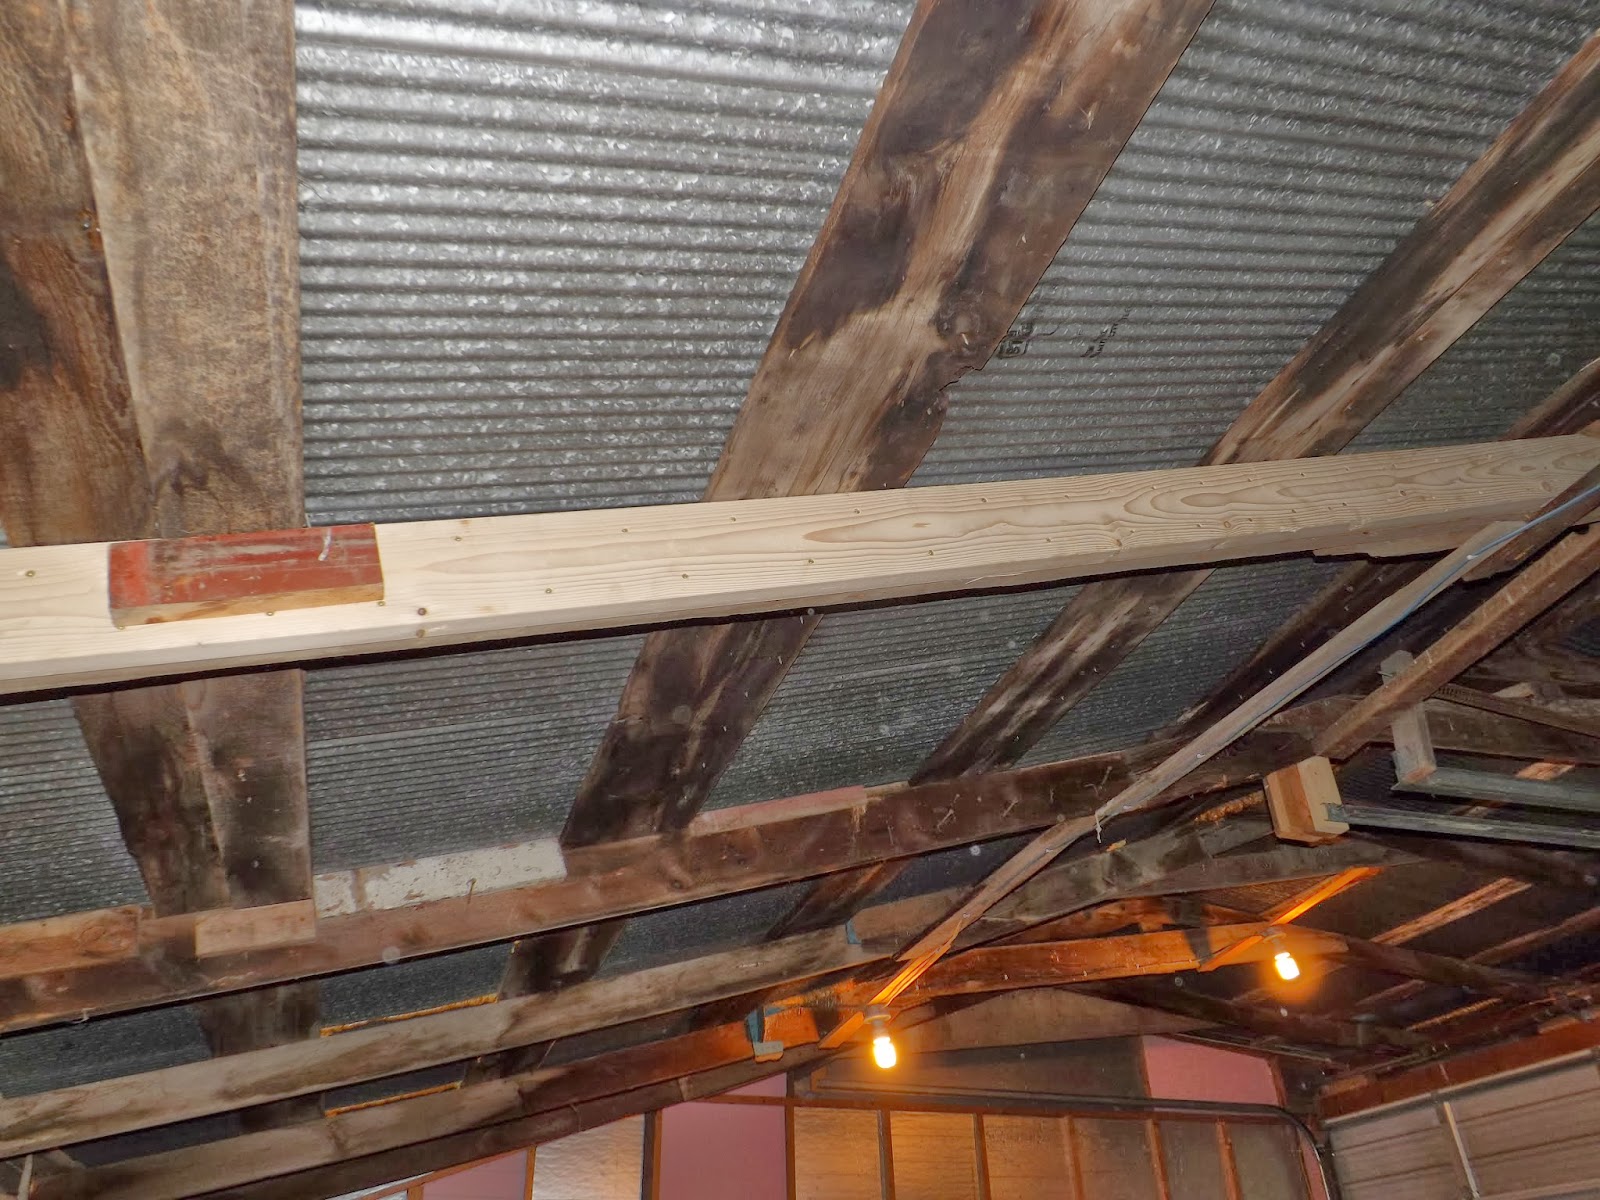
Hi Everyone!  One of the things my brother did while he was here for Christmas was to help my dad re-enforce the rafters (the new boards in the pictures below) in our shop.  The shop/machine shed was built about 45 years ago by my grandfather, my Uncle Bill and his boys.  It's called a pole shed because of the poles that are sunk into the ground and then attached to each other by cross boards at the top and the bottom and the rafters sit on top of the top cross boards with the hole thing clad in corrugated metal sheets.
The last year or so, we've been watching a few cracks develop in the middle rafters (sorry, no pictures).  When the wind blows here on the hill, it really blows.  In fact, most days we have at least a breeze.  And I don't like to be in the shop when it's really windy.  It's really loud in the shop and if you look up, you can see the roof moving up and down which has helped to make the rafters crack.
Dad and I couldn't have done this alone and didn't have to thanks to my brother.  He and my dad used the bucket on the tractor to push the new boards up, raising the roof to bring it back where it should be and than attached the new boards with no less than 60 screws.  This eliminated the bow in the cracked rafters and thus shirring up the roof.
Where it bowed, it held water that dripped into the shop and now it runs off the roof like it should.  So thanks to my brother and Dad, we've gained years of life out of that old roof!  Now to just figure out which dust system to use to contain all of that sawdust I generate.... Thanks for stopping by!

Thursday, January 23, 2014

Dive into Sunshine....

Hi Everyone!  After my mom told me she was redecorating her guest room with a beach theme, I decided to make her something special for her room.  So in between orders and getting ready for craft fairs, I painted a picture for her new room.
 My parents are Snowbirds in Florida during the winter....and they love it.  It wasn't a surprise that Mom wanted to bring some of that into her home.  I tried to come up with something fun and appropriate and then I saw an old advertisement for Florida that was my inspiration.
 It looks better in person.  In my haste to put the picture in my head down, I painted it on canvas board when I had meant for it to go a wooden board.  I had wanted to distress it and make it look old.  But unfortunately paint on canvas doesn't sand well.
 I had originally painted the frame white with a little turquoise coming through, but mom decided she'd rather have it red.  And it looks good in her Beach guest room.  I'll eventually get over the fact that it would look better distressed...but lesson learned.  Thanks for stopping by.

Monday, January 20, 2014

Reupholstered seat...

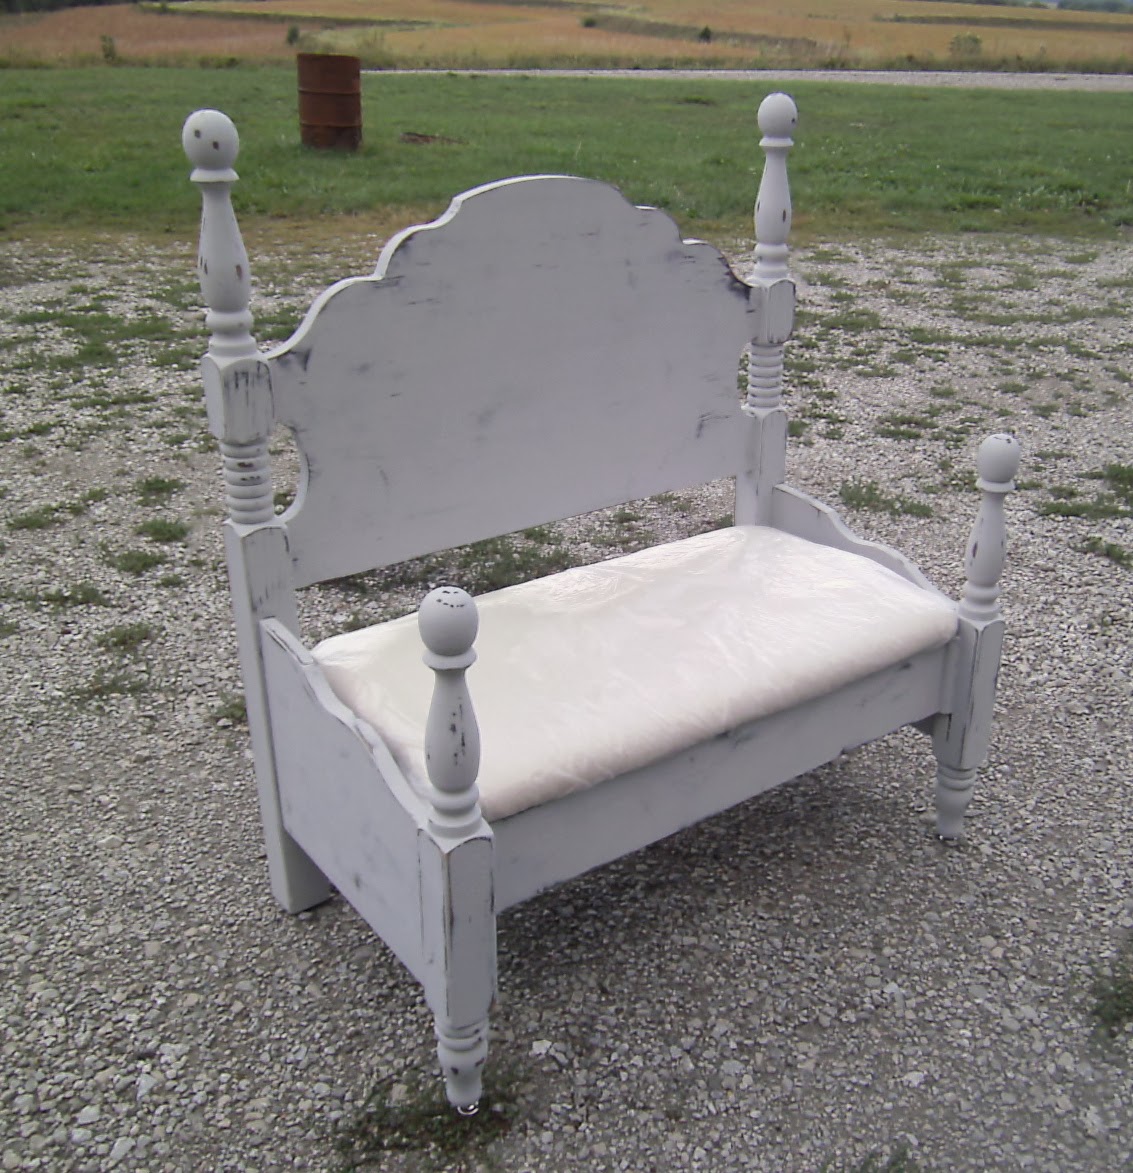
Hi Everyone!  After the Apple Jack's Fair this past September, I gave my mother one of the headboard benches that didn't sell to use in her guest room that she was redecorating.  She wanted a different fabric for the seat, but had to wait until after my Open House for me to reupholster it for her.  So today I thought I'd show you how that turned out.
I really liked how it looked with the cream drop cloth fabric, but mom wanted something different.
She picked out some fabric to match her new room and I reupholstered it.
 I really liked the fabric she picked out....
.....It is just the right touch in Mom's new beach themed guest room.  Thanks for stopping by.